Planning a Backyard Patio Expansion with Pavilion & Plunge Pool
How one damaged patio turned into a full backyard plan: expansion, pavilion, and a layout ready for a future plunge pool without redoing work later.
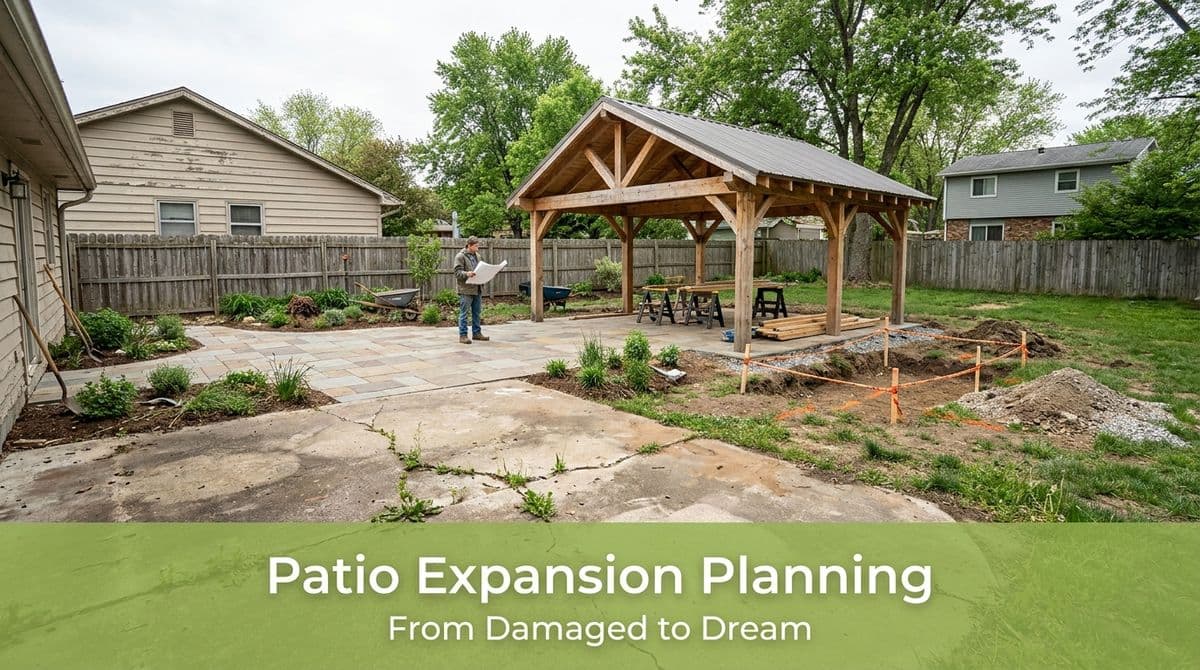
From Damaged Patio to Dream Backyard: One Homeowner’s Plan
We recently got a call from a homeowner — let’s call him Mark — who had what started as a simple problem and turned into a big opportunity. Mark had a roughly 450-square-foot backyard patio that got wrecked by a budget landscaper who power washed it the wrong way. The surface aggregate was exposed, the finish was ruined, and it just didn’t look good anymore.
Instead of just patching it, Mark said, “We’re thinking about expanding the patio to around 725 square feet, adding a small pavilion — maybe 10x12 or 10x14 — and planning ahead in case we decide to add a little plunge pool later. Can you help us figure out how to plan this?”
That’s exactly the kind of project we love, because it’s not just about fixing what’s broken — it’s about creating a long-term plan so you don’t have to tear things up again in a few years. We’ll walk you through the same guidance we gave him.
Step 1: Decide Whether to Repair or Replace a Damaged Patio
Mark’s first question was whether it made sense to save the existing patio or start fresh. In his case, the power washing had exposed the aggregate and left the surface rough and inconsistent. That’s more than just cosmetic — it can affect safety and longevity.
Here are some signs that replacement may be smarter than repair:
- Exposed aggregate or crumbling surface after power washing or freeze-thaw cycles
- Multiple cracks that run across slabs or sections, not just hairline surface cracks
- Uneven settling where water puddles or slabs rock when you walk on them
- Previous bad patch jobs that are already failing or peeling
If you’re planning a major upgrade anyway — like Mark’s expansion and pavilion — we typically recommend treating the project as one cohesive redesign rather than patching old work and trying to make it match. It usually gives you a better end result and simplifies drainage and layout.
Step 2: Plan the Patio Expansion Around How You’ll Use It
Mark wanted to grow from about 450 square feet to around 725. That’s a solid size for a family that wants room for dining, lounging, maybe a grill station, and still space to move around.
When we’re planning an expansion like this, we walk through a few key questions:
- Where will the main seating area go? Plan at least 10x10 feet for a comfortable dining set.
- Do you want a separate lounge zone? A couple of chairs and a fire pit can easily take another 8–10 feet of depth.
- What are the traffic paths? You want clear walkways from the house to the yard, pavilion, and any future pool.
- Sun and shade patterns: Think about where the sun hits in the afternoon when you’re most likely to use the space.
With Mark, we looked at his existing footprint and sketched how the expansion could wrap naturally around the back of the house, leaving space where a future plunge pool might go without turning the whole yard into hardscape.
Step 3: Choosing a Pavilion – Kit vs. Custom Build
A big part of Mark’s vision was a small pavilion for shade and outdoor living — something in the 10x12 to 10x14 range. We walked him through the two main paths we typically offer:
Option 1: Pavilion Kits
We’ve installed a number of pavilion kits from places like big-box stores. They can be a great choice if you want to keep costs reasonable and timelines predictable.
Pros of kits:
- Generally more budget-friendly
- Pre-engineered sizes and designs
- Faster to source and assemble
Things to consider:
- Limited design customization
- Standard ceiling finishes, posts, and trims
- May require careful site prep and anchoring to meet local codes
Option 2: Semi-Custom Pavilion with a Carpenter
For homeowners who want a more finished look, we also coordinate with a carpenter to build a semi-custom structure. As we explained to Mark, this doesn’t have to mean “over the top” — it can just mean a few nicer details:
- Tongue-and-groove ceiling for a richer interior look
- Vinyl-wrapped posts for low maintenance and a clean, white finish
- Custom trim and fascia to match the home’s style
Either route, we plan the pavilion location and footings together with the patio layout so that everything feels integrated and structurally sound.
Step 4: Designing Today with a Future Plunge Pool in Mind
Mark wasn’t sure if they’d actually install a plunge pool, but he wanted to plan for it now so they wouldn’t have to rip up the new patio later. That’s a smart move.
While we don’t install pools ourselves, we often coordinate with pool companies as part of the design. In Mark’s case, we talked about fiberglass plunge pools — often a simpler, less invasive option than full gunite or vinyl builds.
Here’s how we design the patio and pavilion to be “pool-ready” even if the pool comes later:
- Leave a dedicated pool zone with enough clear space for the shell, coping, and code-required clearances.
- Think through access for excavation equipment so a future contractor can still get in and out.
- Plan drainage grades so water flows away from both the house and the future pool.
- Rough in conduits or paths for future electric lines, lighting, or pool equipment where possible.
By doing this upfront, you protect your investment in the new patio and pavilion and make the eventual pool project smoother and less disruptive.
Step 5: Don’t Forget the Front Yard Refresh
Like many homes built or renovated around 2014, Mark’s front landscaping had simply overgrown its original design. Shrubs were too big, beds felt crowded, and the overall look was tired.
When we pair a backyard overhaul with a front yard refresh, we aim for:
- Consistent materials: Similar pavers or stone styles at the front walk and back patio
- Updated plantings: Right-sized shrubs and perennials that won’t overwhelm the space in a few years
- Curb appeal that matches the new backyard: So the home looks as good from the street as it feels out back
Planning Your Own Patio Expansion
If you’re staring at a damaged patio like Mark was, it can feel frustrating — but it’s also a chance to rethink the whole space. With a bit of planning, you can:
- Replace a failing patio with something safer and better looking
- Add a pavilion for shade and year-round usability
- Design now for a future plunge pool, even if it’s a “someday” project
The key is treating the yard as one connected plan instead of a series of unrelated projects. That way, each phase builds toward the backyard you really want — without undoing work you just paid for.